What’s new in PTW 1.5.5.3
The following is a full list of features that were implemented in Pisys 1.5.5.3 release.
1.1.1.Option to Print Inspection.
We have added the ability to print out individual inspections when added to a permit to work. Updated with the following changes:
- Print button added to each Inspection row against a Permit.
- Print button added to Admin -> Inspection Types alongside existing Preview button i.e. allows the User to view/print a blank version of that Inspection.
- The printed Inspection uses much of the same page-generation methods as the actual Inspection screen except it is read-only and has been adjusted for an A4 sized page.
1.1.2.Add Company Information on the Permit Board.
We have added a way for a live permit on the permit board to display the Company name as well as the Responsible Person. The changes were made by adding a “Display Company” checkbox alongside the existing “Display Recipient” option in the admin screen.
When selected, the Company is shown as the first text in the Board item. The height remains the same as if “Display Recipient” was selected so as not to make it any larger than at present. Regarding height, Board items are either 135px or 205px i.e.
- Neither Recipient or Company selected = 135px
- Either Recipient or Company selected = 205px
1.1.3.Option to Set Validity Period to Maximum.
Maximum permit validity period / issue period is specified from the panel edit screen. Currently, when using the “Validate Before Issue” workflow stage, a user must always manually input the validity period, up to the maximum allowable.
A lot of our customers want to have an approval step but have the validity period always set to the maximum allowable date and time, without having to input it manually every time. We have now added an option to default the validity period to maximum at the “validate before issue” stage.
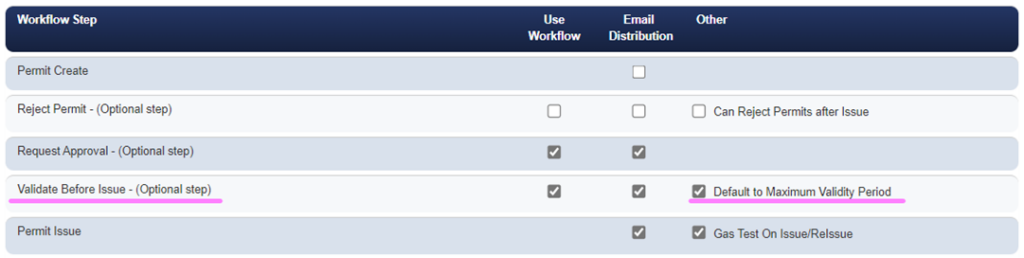
Admin -> Permit Version
Added a new checkbox in the “Validate Before Issue” row under column “Other” labelled “Default to Maximum Validity Period”.
When selected, upon opening the Validation screen on a Permit using that Permit Version, the new “Use the Maximum Validity Period (xx days/hours)” checkbox will be pre-selected. The User can still opt to uncheck this checkbox and input their own dates/times if required.
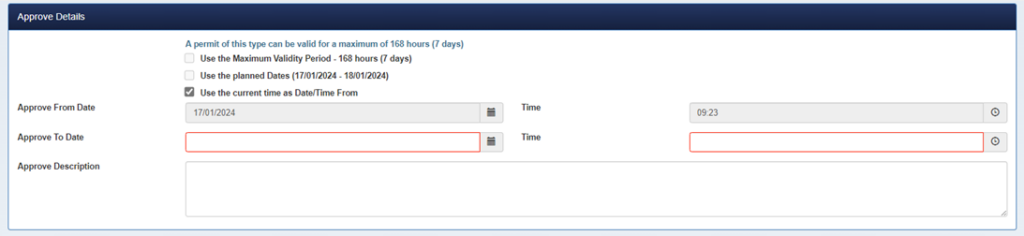
Permit Edit -> Validate/Approve.
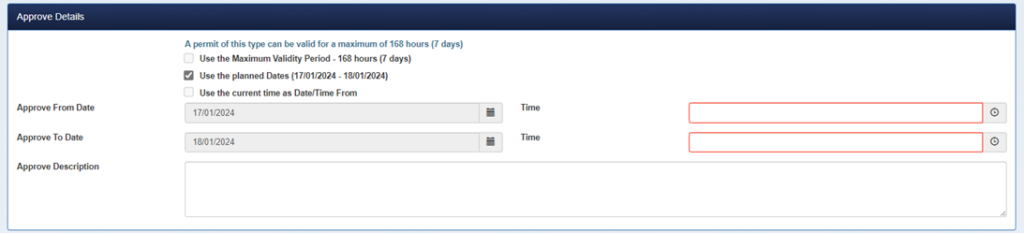
Added a checkbox labelled “Use the Maximum Validity Period (xx days/hours)”. Selecting the checkbox will make the To and From Date/Time inputs read-only and display the calculated dates/times. Deselecting the checkbox will make the Date/Time inputs editable but will leave the calculated dates/times in place so they can be easily modified.
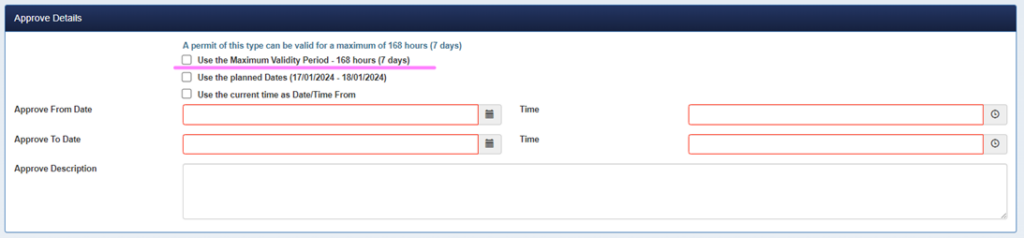
For this new one and the existing checkboxes, when 1 is selected, the other 2 will become read-only i.e.
- Use the planned Dates (xxx – xxxx)
- Use the current time as the Date/Time From
- Use the Maximum Validity Period (xx days/hours)
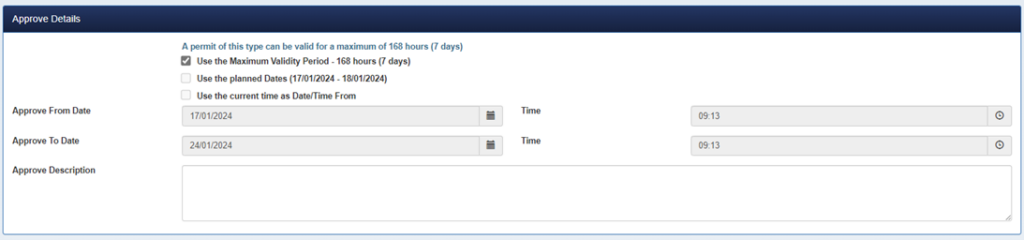
Upon completing the Validation screen, if “Use the Maximum Validity Period (xx days/hours)” has been selected, the dates/times will be stored based on the ‘save’ time (i.e. not the time when the checkbox was selected and therefore dates/times displayed). This will prevent potential issues with retrospective, ‘dates cannot be in past’ type checks.
Also, for consistency, we have updated existing “Use Planned…” and “Use Current…” checkbox clicks so that the appropriate Dates/Times are displayed in a similar way to the new “Use Maximum…” checkbox i.e. instead of just being greyed-out/blank.
1.1.4.Permit Handback changes to reflect better what happens to Isolations.
Functionality has been added as follows:
Permit Question Set
Added the following settings related to the Isolation Close-Type:
- Workflow Step (dropdown with options for “None”, “Handback” and “Close”)
- Required (checkbox)

Permit Handback/Close
On the Handback or Close screen, toggle the “Close Type” dropdown based on whether it’s visible and mandatory or not.
Permit Edit
Under the existing read-only “Handback Details” section, display the list of the Isolations with the selected “Close Type”.
NOTE: It will only display on the Edit screen if at least 1 Isolation has a Close-Type selected.
Isolation Edit
Under the existing “Connected Permits” section, we have added a column showing the selected “Close Type”.
1.1.5.Create New Isolation Checkbox Visibility.
A permit is created and associated with an isolation using the Isolation Link control as part of the permit question set. If the Create New Isolation checkbox is set to NO (not selected) on Creation an isolation was not created together with the permit. If a user went back in the permit edit screen the Isolation Link will not have the Create New Isolation checkbox anymore.
Technically and by design this was correct as the permit has moved on from the create state, however it was proving problematic for some of our users, so we now allow the Create New Isolation checkbox to appear after initial Permit creation.
As a fail-safe if after Permit creation a “Create New Isolation” checkbox is selected, the user will be required to first click the “Save” button to go through the Isolation creation process before attempting to click any other Permit buttons which trigger a save e.g. History, Approve, Reject, etc.
If attempting to select a “Create New Isolation” checkbox and then clicking “Approve” for example, a message will be displayed informing the user to save changes first. The message will state: ” You have selected the “Create New Isolation” checkbox. Please click Save to complete this process before proceeding”.
The user can still create the Isolation separately and then link it to the permit via the dropdown.
1.1.6.Home & Permit List screen UI enhancements.
For the Home screen, instead of loading and rendering all data when opening the screen, this has been updated as follows:
- When initially opening the screen, the summary data for each tab is retrieved (i.e. My Actions, My Items, Permits, Isolations and Routine Duties).
- This process returns a count of the number of items in each grouping/status e.g. Permits Created, Long Term Isolation Expiries, Open Routine Duties, etc.
- Note that summary-retrieval doesn’t happen on each tab-click. It only happens upon login or subsequently clicking “Home”.
- This has the advantage of saving the effort/time of repeatedly getting the same information.
- For any grouping/status which has data, a subtab under the appropriate parent tab will be provided along with the total number of records for that grouping displayed in brackets).
- The first subtab will be automatically selected, and the User can then click the appropriate tab to refresh the screen and retrieve its data.
- Note that instead of the original load-everything method, clicking a parent or sub-tab will always refresh the page with new data instead of simply toggling between different views.
For the Permit List screen, this has been updated with a new toggle for “Include Complete”.
- This is unchecked by default and therefore when initially opening the List screen, only non-Complete and non-Closed Permits are listed.
- Selecting the checkbox triggers a page refresh with Complete & Closed Permits included in the results.
1.1.7.Remove General Attachments.
After an attachment has been uploaded, there is no way of removing it. This is causing a problem for files that get uploaded accidentally. We have added a remove attachment option for files uploaded using the “general” attachments button that appears at the bottom of the screen.
Functionality updated as follows:
- Once the Permit becomes read-only (i.e. attachments can no longer be removed in the normal way), display a ‘Delete’ button for each attachment in the “Other Attachments” table.
- The ‘Delete’ button visibility is determined by the attachment creation/added date and the various Permit Workflow dates e.g.
- If the Permit has a Validated date, don’t allow removal of attachments created before that date.
- If the Permit has an Issued date, don’t allow removal of attachments created before that date.
- If the Permit has a Handback date, don’t allow removal of attachments created before that date.
- Upon clicking the button, as with other Delete-clicks in the system, the User confirms whether they want to proceed before doing the delete and refreshing the screen.
The following is a list of enhancements that were implemented in PTW 1.5.5.3 release. The list includes bug fixes and new functionality.
- PTW-1454 – Upgrade PTW tokens to use JWT instead of the current guid-generation.
- PTW-1452 – Home & Permit List Screen Performance.
- PTW-1397 – Add the Summary Print of an RA to a Permit instead of the full RA print.
- PTW-1051 – Auto-Sizing Plot Plans.
- PTW-1463 – Announcements coming from Pisys360.
- PTW-1350 – Allow edit of RAs connected to Permits.
The following list of bugs were identified and were also fixed in this release:
- PTW-997 – Create New Isolation textbox is not visible once a permit has moved from the create stage.
- PTW-1479 – Isolation Copy button appears for archived versions.
- PTW-1478 – Top Questions are being populated on Print Outs.
- PTW-1477 – Server Error when creating new PTW instances.
- PTW-1476 – Attachment and Signature controls do not lose their red required border when populated.
- PTW-1473 – Server Error when the Plot Plan Show Permits filter is set to None.
- PTW-1472 – Move and Rename the new Include Complete checkbox.
- PTW-1470 – Responsible Person Initial Issue.
- PTW-1469 – Permit Type shows Hot Work icon even when no Hot Work is selected.
- PTW-1467 – Gas Tests being triggered when a panel that requires no gas test is used.
- PTW-1466 – Print Inspection is not showing colours for dropdown lists when a user tries to save it as a PDF.
- PTW-1465 – Copy button appears on Handback screen for Archived Versions.
- PTW-1459 – Area Current Permits section in Management does not show the dots and icons properly for permits.
- PTW-1457 – Error When Clicking “Return” on Permit.
- PTW-1456 – Archived or Locked user in PTW still shows the PTW related buttons in TRMS.
- PTW-1433 – Mandatory Fields for Handing Back a Late Permit are partially Highlighted.
- PTW-1415 – Issue When Copying Permits